This tutorial is on interior lighting in Maya and Mentalray. Thanks to Dapoon Rai Dewan for providing the scene.
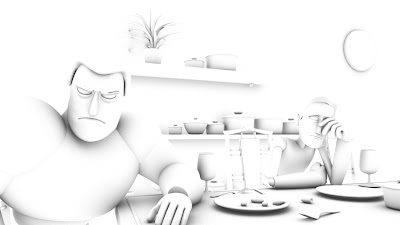
This is our scene and the tutorial shows how to create lighting through a window or a door.

Another view.

All the sides are covered up and the window that is seen in the picture is the only opening in this room. When you set up the scene make sure that there are no unwanted openings on the wall because it causes light leaking.
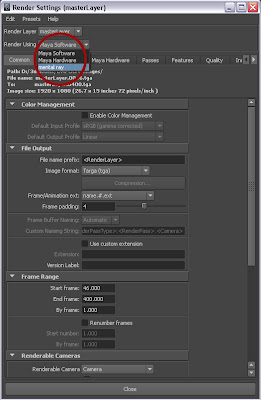
1) Step one is to change the renderer from Maya software to Mentalray. Go to Window - Rendering Editors - Render Settings. Render using - Mentalray.
 2) In the quality tab change the quality preset to production.

3) In this scene, the main light source is the sunlight entering through the window. To create sunlight go to Create - Lights - Directional Light.

4) In the Attribute Editor, scroll down to Raytrace Shadow Attributes under the 'Shadows' section. Check 'Use Raytrace Shadows'. Increase the 'Light Angle' to 1 to make the shadow edges softer.' Shadow edges tend to become softer at the edges as the distance to the object creating shadow increases. Shadows Rays are increased to 20 to avoid graininess on the shadow edges. These values vary according to the scale of the scene so some tuning is required to get the desired look.

'Ray Depth Limit' is increased to 2 to enable the reflective objects to reflect shadows.
5) DIrectional Light can be placed anywhere in the scene. Using 'Rotate' tool play around with the angle of the light and do test renders.
Render with keylight and shadows.

6) Once the direction of the sunlight is finalized, move on to the diffused skylight. Area lights are very handy in simulating skylight. It creates soft shadows.
Create - Lights -Area Light.

7) Scale the size of the Area Light to the size of the window\door. Scale of an Area Light is very important as it affects the light intensity and shadow softness.Keep it outside the wall, very close to the window\door.If more windows\doors are there then multiple area lights need to be used.

8) Render with sunlight + skylight (directional light + area light)

I have given a very low intensity to the area light (.25) to achieve a dramatic effect. A high contrast creates a feeling of dark, strong emotions. If you need an emotionally neutral scene or want to make everything bright and happy then increase the intensity of the area light.
9) For the light bounce Go to Render Settings - Indirect Lighting tab. Scroll down to Final Gathering section. Check the box and change the 'Secondary Diffuse Bounces' value to 1.

Render with Final Gathering

10) Ambient Occlusion pass.
Take these two images(render sequences in case of animation) to a compositing sotware.
Adobe Aftereffects is what I use.
11) Place the occlusion image on top of the final gathering image and change the blending mode of the occlusion to multiply.

Final image with some minor color corrections.

This is our scene and the tutorial shows how to create lighting through a window or a door.

Another view.

All the sides are covered up and the window that is seen in the picture is the only opening in this room. When you set up the scene make sure that there are no unwanted openings on the wall because it causes light leaking.
1) Step one is to change the renderer from Maya software to Mentalray. Go to Window - Rendering Editors - Render Settings. Render using - Mentalray.


3) In this scene, the main light source is the sunlight entering through the window. To create sunlight go to Create - Lights - Directional Light.

4) In the Attribute Editor, scroll down to Raytrace Shadow Attributes under the 'Shadows' section. Check 'Use Raytrace Shadows'. Increase the 'Light Angle' to 1 to make the shadow edges softer.' Shadow edges tend to become softer at the edges as the distance to the object creating shadow increases. Shadows Rays are increased to 20 to avoid graininess on the shadow edges. These values vary according to the scale of the scene so some tuning is required to get the desired look.

'Ray Depth Limit' is increased to 2 to enable the reflective objects to reflect shadows.
5) DIrectional Light can be placed anywhere in the scene. Using 'Rotate' tool play around with the angle of the light and do test renders.
Render with keylight and shadows.

6) Once the direction of the sunlight is finalized, move on to the diffused skylight. Area lights are very handy in simulating skylight. It creates soft shadows.
Create - Lights -Area Light.

7) Scale the size of the Area Light to the size of the window\door. Scale of an Area Light is very important as it affects the light intensity and shadow softness.Keep it outside the wall, very close to the window\door.If more windows\doors are there then multiple area lights need to be used.

8) Render with sunlight + skylight (directional light + area light)

I have given a very low intensity to the area light (.25) to achieve a dramatic effect. A high contrast creates a feeling of dark, strong emotions. If you need an emotionally neutral scene or want to make everything bright and happy then increase the intensity of the area light.
9) For the light bounce Go to Render Settings - Indirect Lighting tab. Scroll down to Final Gathering section. Check the box and change the 'Secondary Diffuse Bounces' value to 1.

Render with Final Gathering

10) Ambient Occlusion pass.

Take these two images(render sequences in case of animation) to a compositing sotware.
Adobe Aftereffects is what I use.
11) Place the occlusion image on top of the final gathering image and change the blending mode of the occlusion to multiply.

Final image with some minor color corrections.

Thank you so much for these tutorials Sarath=D As an animation student with a growing interest in lighting, these are gold.
ReplyDeleteIf you could show any exmaples of using different coloured lighting to get different moods that would be excellent =D
No pressure though just happy you and Dapoon have put in the effort for these so far. Thank you again.
happy to know that you find it usefull. I will come up with coloured lighting soon.
ReplyDeletethanks so much, this is great!!!!
ReplyDeletevery cool post. thanks for doing this Sarath. I agree with Andrew as I am also looking in rendering to make my animations have some feeling. Much appreciated
ReplyDeleteWow.......!!
ReplyDeleteExcellent lighting tutorial here.....!!
But when we check final gathering under indirect lighting tab, then we lost production quality..
it automatic unchecked.
we have to choose any one from these both. :(
any idea how to fix..??
Gaurav, that doesn't matter. The quality is still same. It shows custom, that's all. You can go ahead with final gather.
ReplyDeleteGreat anticipation of animation work with so much ease it. Highly recommended for students and professionals who are new in this field.
ReplyDelete