This is a simple lighting tutorial for beginners in lighting with Maya and Mentalray.
This is our scene and this awesome animation is done by Dapoon Rai Dewan.
Please follow this link to watch the animation.
http://vimeo.com/23422916
This process can be followed to light any outdoor scene. I will be trying to achieve an evening scene.
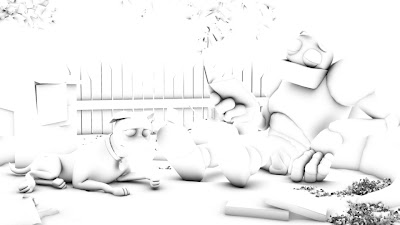
1) Software render with default light.

2) Now we need to change our renderer from software to Mentalray.
For that go to Window - Rendering Editors - Render Settings. Render using - Mentalray.

3) If Mentalray is missing in the drop-down menu, MayatoMr plug-in must be loaded from the Plug-in manager.
Windows - Settings/Preferences - Plug-in manager.

4) Go to the 'Quality' tab in the Render Settings window and change the quality preset to 'Production'

5) Now go to Create - Lights - Directional Light.

Directional Light is the best to simulate sunlight.
6) Go to the Attribute Editor and scroll down to Raytrace Shadow Attributes under the 'Shadows' section. Check 'Use Raytrace Shadows'.

Directional lights can be placed anywhere in the scene. Light direction and shadows depend upon only the angle of light which can be controlled using the 'Rotate' tool.
We may have to play around with the angle of the light and do test renders until the desired results are obtained.
This is my render.Shadows can be seen in this one.

7) Time to turn on FinalGathering.
Go to Render Settings - Indirect Lighting tab. Scroll down to Final Gathering section. Check the box and change the 'Secondary Diffuse Bounces' value to 1.

Render the seen. This is what i have got. We can see the light bounce.

8) Outdoor scenes require skylight as well. To simulate that, select camera, go to attribute editor, scroll down to environment and change the background color in to blue. Final Gather will take care of the rest.

Render the scene.

9) To make it look like an evening, we need change the light's color. I have changed the color, intensity and the shadow color.

10) Edit the 'Raytrace Shadow Attributes' in the light's Attribute Editor to make the shadow edge a little soft. We need to tweak these values to get the correct amount of softness.

This is the render after the changes.

This is the final render in Maya. To add a background image and Depth of Field, we have to take this image along with couple of other render passes to a compositing software.
To take those extra passes,
11) Select all the objects in the scene except the lights, in the Channel Box/Layer Editor, select 'Render' tab and click on 'create new layer and assign selected objects' (the right most button).

A new render layer is created now.
12) Right click on the new layer and select attributes. Attribute Editor will be opened.
Click on the preset button and select Occlusion.

13) Occlusion shader opens up in the Attribute Editor. It needs some edits. So click on
the 'Out Color'.

14) Increase the Samples to 32. The other parametre that have to be edited is 'Max Distance'. This value depends upon the scale of the scene. Something in between 1 and 100 must work unless the scene is too small or too big.
The render should look closer to this.
15) Now right click on the occlusion render layer - Add New Render Pass- Camera Depth.
This Depth Pass is used to add DOF in the compositing software.

Double click on the layer to rename it. Remember to make the masterLayer renderable by clicking on this button before the animation is rendered.

Time to composit!. I use Adobe Aftereffects for compositing.
16) Once the animation is rendered open Aftereffects.
17) Go to File - New - New Project.
18) Go to Composition - New Composition.
Enter the width and the hight of the render, Frame rate and duration, press OK.
19) To import the render files and the background image, File - Import - Multiple files. In the 'Interpret Footage' window, check Premultiplied-matted with color.

20)Drag and drop all the layers into the Timeline window. Change the Mode of the occlusion layer to Multiply. Select the occlusion layer and press 'T' to adjust the opacity.

21) To add DOF, this plug-in has to be installed.
http://www.frischluft.com/lenscare/index.php
22) Go to Layer - New - Adjustment Layer. A new layer will be shown in the timeline.
Right click on that, Effects - Frischluft - Depth of Field.

23) In the newly appeared Effects Control window, increase the radius and select the depth layer from the drop-down menu. Click on the '+' sign and then click on the scene to select the area of focus. Radius can be used to increase or decrease the blur amount.

24) To do some color corrections, right click on the masterlayer - Effects - Adjust -Curves or Levels. This is my final image.

Please contact me if you have any doubts or need any clarifications.
sarathmkm@gmail.com
This is our scene and this awesome animation is done by Dapoon Rai Dewan.
Please follow this link to watch the animation.
http://vimeo.com/23422916
This process can be followed to light any outdoor scene. I will be trying to achieve an evening scene.
1) Software render with default light.

2) Now we need to change our renderer from software to Mentalray.
For that go to Window - Rendering Editors - Render Settings. Render using - Mentalray.

3) If Mentalray is missing in the drop-down menu, MayatoMr plug-in must be loaded from the Plug-in manager.
Windows - Settings/Preferences - Plug-in manager.


5) Now go to Create - Lights - Directional Light.

Directional Light is the best to simulate sunlight.
6) Go to the Attribute Editor and scroll down to Raytrace Shadow Attributes under the 'Shadows' section. Check 'Use Raytrace Shadows'.
Directional lights can be placed anywhere in the scene. Light direction and shadows depend upon only the angle of light which can be controlled using the 'Rotate' tool.
We may have to play around with the angle of the light and do test renders until the desired results are obtained.
This is my render.Shadows can be seen in this one.

7) Time to turn on FinalGathering.
Go to Render Settings - Indirect Lighting tab. Scroll down to Final Gathering section. Check the box and change the 'Secondary Diffuse Bounces' value to 1.

Render the seen. This is what i have got. We can see the light bounce.

8) Outdoor scenes require skylight as well. To simulate that, select camera, go to attribute editor, scroll down to environment and change the background color in to blue. Final Gather will take care of the rest.
Render the scene.

9) To make it look like an evening, we need change the light's color. I have changed the color, intensity and the shadow color.
10) Edit the 'Raytrace Shadow Attributes' in the light's Attribute Editor to make the shadow edge a little soft. We need to tweak these values to get the correct amount of softness.

This is the final render in Maya. To add a background image and Depth of Field, we have to take this image along with couple of other render passes to a compositing software.
To take those extra passes,
11) Select all the objects in the scene except the lights, in the Channel Box/Layer Editor, select 'Render' tab and click on 'create new layer and assign selected objects' (the right most button).

A new render layer is created now.
12) Right click on the new layer and select attributes. Attribute Editor will be opened.
Click on the preset button and select Occlusion.

13) Occlusion shader opens up in the Attribute Editor. It needs some edits. So click on
the 'Out Color'.

14) Increase the Samples to 32. The other parametre that have to be edited is 'Max Distance'. This value depends upon the scale of the scene. Something in between 1 and 100 must work unless the scene is too small or too big.
 I
I
15) Now right click on the occlusion render layer - Add New Render Pass- Camera Depth.
This Depth Pass is used to add DOF in the compositing software.

Double click on the layer to rename it. Remember to make the masterLayer renderable by clicking on this button before the animation is rendered.
Time to composit!. I use Adobe Aftereffects for compositing.
16) Once the animation is rendered open Aftereffects.
17) Go to File - New - New Project.
18) Go to Composition - New Composition.
Enter the width and the hight of the render, Frame rate and duration, press OK.
19) To import the render files and the background image, File - Import - Multiple files. In the 'Interpret Footage' window, check Premultiplied-matted with color.

20)Drag and drop all the layers into the Timeline window. Change the Mode of the occlusion layer to Multiply. Select the occlusion layer and press 'T' to adjust the opacity.

21) To add DOF, this plug-in has to be installed.
http://www.frischluft.com/lenscare/index.php
22) Go to Layer - New - Adjustment Layer. A new layer will be shown in the timeline.
Right click on that, Effects - Frischluft - Depth of Field.

23) In the newly appeared Effects Control window, increase the radius and select the depth layer from the drop-down menu. Click on the '+' sign and then click on the scene to select the area of focus. Radius can be used to increase or decrease the blur amount.

24) To do some color corrections, right click on the masterlayer - Effects - Adjust -Curves or Levels. This is my final image.

Please contact me if you have any doubts or need any clarifications.
sarathmkm@gmail.com
Super Thanks To you And Dapoon for Sharing the link with us!
ReplyDeleteThis is fantastic stuff. Thank you so much for creating this Sarath! I'm going to try it out right now!
ReplyDeleteWow...Here are the excellent lighting tutorials....i am searching for long time...
ReplyDeletethanks u lot....
Hmmm, a new way for me to say "that was amazing, beautiful and thanks so much for taking the time, ebergy and effort to make that tutorial"
ReplyDeleteI don't have one so i'll settle for thanks for making something really difficult, really understandable =)B
tnx u so much for this upload,
ReplyDeletegreat sharath good one it works great. does this one work for big scenes
ReplyDeleteShankar.Artist, yes it does!!
ReplyDeletehey TNX for the tutorial. it is very nice tutorial and easy to see and understand the all way. And easy way to light and fast rendering,
ReplyDeleteThank you...
ReplyDeleteWow this is a very nice tutorial and perfectly explained. I find lighting the hardest part always so thaks a lot ^^
ReplyDeleteThanks for share about exterior lighting ..I want to share more information about exterior lighting..I am sure you will get more knowledge about exterior lighting.. Exterior lighting:- Buy Bathroom Cabinets Lighting and More, Indoor Lights chandelier pendants crystal items on eBay.Find a huge selection of Single Vanities tops taps,Double Vanities basins mirrors, Outdoor Lights stainless steel items.You can get many more itoms which is required.You can get the information about exterior lighting:
ReplyDeletehttp://stores.ebay.com.au/Bathroom-Cabinets-Lighting-And-More
Cool man.this is real good.
ReplyDeleteexcellent job...grt work!!
ReplyDeleteVery nice tutorial! I've worked with Light wave for 5 years now, but I still have trouble grasping Maya sometimes. Thanks for all your help.
ReplyDeleteThis comment has been removed by the author.
ReplyDeleteExcellent tutorial! This is great! But whenever you need assistance for another kind of light, surely custom lights boston will be pleasured to customize one for you.
ReplyDeleteHi Sarah,
ReplyDeleteJust out of curiosity how did you manage to get flicker free animations?
nice blog
ReplyDeleteAwsome tutorial .. need to know if this can be achieved by any other render engine like Arnold
ReplyDelete